Outils pour utilisateurs
Table des matières
Index
commandes diverse
puissance du signal wifi
watch -n 1 cat /proc/net/wireless
| desc | link | level | noise | conso |
|---|---|---|---|---|
| Rpi Zero W sur poteau | 43. | -67. | -256 | |
| Rpi Zero W ds haie | 42. | -68. | -256 | |
| Rpi Zero W bureau | 60. | -50. | -256 | 0.2-0.3W |
| Rpi Zero W sous télé | 50. | -60. | -256 | |
| Rpi Zero W portail | 27. | -83. | -256 | 0.1W ? |
| Rpi Zero W abris jardin parallèle mur | 28. | -82. | -256 | |
| Rpi Zero W abris jardin perpendiculaire mur | 34. | -76. | -256 | |
| Rpi A W311U portail | 45 | -65 | ||
| Rpi A W311U pilier | 49 | -61 |
https://www.briandorey.com/post/raspberry-pi-zero-w-external-antenna-mod
arret du raspberry
sudo poweroff
comment être sur que l'OS est bien arrêté ?: P1-08 → GPIO 14 → UART0_TXD : majoritairement à 3,3V lorsque l'OS est actif
changer la vitesse du port serie
source http://elinux.org/RPi_Serial_Connection
//configure la console de sauvetage
//donc pas obligatoire pour l'utilisation de mon PIC qui envoie poweroff
//Be careful doing this, as a faulty command line can prevent the system booting.
vi /boot/cmdline.txt   //remplacer 115200 par 19200
//le rpi ne semble pas supporter le 28800

Secondly, after booting, a login prompt appears on the serial port
vi /etc/inittab //remplacer 115200 par 19200
Camera
raspistill -o test.jpg -rot 180 //single capture en full résolution 280mA 6s
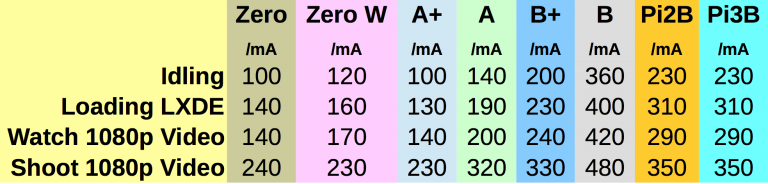
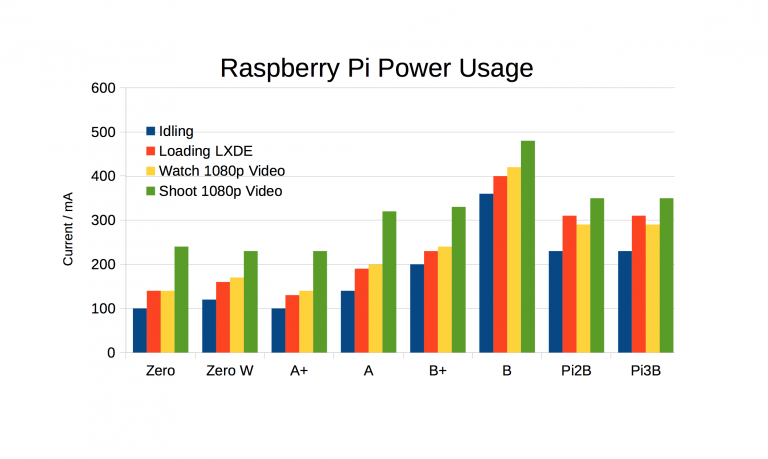
consomation
| CFG | stand by | OFF |
|---|---|---|
| transfo asus 5V 2A | 0W | |
| rpi Tyoe Zero W transfo asus (fresh install of raspian lite) | 0.1W ! | 0W |
| rpi Tyoe Zero W transfo asus (0.6W en prise de photo) | 0.2W-0.3W | 0W |
| rpi Type A , CC1101 , wifi tenda w311U+ , transfo asus | 0.6W | |
| rpi Type B , CC1101 , transfo asus | 1.8W | 0.1W |
-
- Disable HDMI : 25mA : If you're running a headless Raspberry Pi, there's no need to power the display circuitry, and you can save a little power by running /usr/bin/tvservice -o (-p to re-enable). Add the line to /etc/rc.local to disable HDMI on boot.
GIT
rallonger la validité du psw
git config --global credential.helper "cache --timeout=3600"
pour le travail journalier
git fetch
git pull
git status
git commit toto.c -m "bla bla"
ou git add -A && git commit -m "bla bla" //pour tout committer
ou git commit -a -m"bla bla"
git push


tree view :
  * git log --graph --pretty=oneline --abbrev-commit --all --decorate | tig
  * glt = !git --no-pager log --oneline --all --graph --decorate -n 20

resumé de diff : git diff --stat
script compilation sous notepad++ , utilisé pour tester sur PC
npp_save
cd "$(CURRENT_DIRECTORY)"
gcc "$(FILE_NAME)" -o $(NAME_PART).exe -lpthread -Wall
NPP_RUN $(NAME_PART).exe
on utilise la chaine de compilation \INSTALL\gcc-4.5.0.zip
creation d'un repository local (à partir de la fenêtre terminal de source tree)
git init --bare myrepo
ou git init pour créer un dépôt git dans un répertoire de travail , puis git remote add origin https://fred31@bitbucket.org/fred31/xxxxx.git pour faire la connection avec un depot bitbucket
branch
  git remote  -v             // list of remote repositories
  git branch une_branche    // create a branch
  git checkout une_branche   // move to this bracnch
  git branch    // list of active branch
  git mergetool main.c  (inclus le git add)
  git rebase --continue (surtout ne pas faire git commit , c est le rebase que le "fera")
  git push origin feature_branch_name    //Push your branch to the remote repository
  //-u option to set up a tracking branch?
Mettre de coté une modif
git --no-pager log --oneline --graph --decorate -n 15
git branch modif_a_mettre_de_cote
git checkout branche_principale
git reset --hard 73b599328
git push origin branche_principale -f
ou git push origin HEAD:branche_principale -f
~/gittest  (modifSKR)$ git glt
* 9eea3bb (master) modif master F2 2eme
* 3a87e6c modif master F2
| * 0ce25ca (HEAD -> modifSKR) modif ds branche
|/
* 98df5cf 1er modif du master
* 2920836 init du depo
0
~/gittest  (modifSKR)$ git rebase origin/master
fatal: Needed a single revision
invalid upstream 'origin/master'
1
~/gittest  (modifSKR) $ git rebase 9eea3bb
First, rewinding head to replay your work on top of it...
Applying: modif ds branche
0
~/gittest  (modifSKR) $ git glt
* 4d20e35 (HEAD -> modifSKR) modif ds branche
* 9eea3bb (master) modif master F2 2eme
* 3a87e6c modif master F2
* 98df5cf 1er modif du master
* 2920836 init du depo
.gitconfig
glt = !git --no-pager log --oneline --all --graph --decorate -n 20


[diff]
        tool = mybc4
        #Show commit details of the changed submodules when running "git diff" from the parent repository
        submodule = log
[difftool]
        prompt = false
[difftool "mybc4"]
        #use cygpath to transform cygwin path $LOCAL (something like /tmp/U5VvP1_abc) to windows path, because bc4 is a windows software
        cmd = '/c/Program Files/Beyond Compare 4/BComp.exe' \"$(cygpath -w $LOCAL)\" \"$(cygpath -w $REMOTE)\"
[merge]
        tool = mybc4
[mergetool]
        prompt = false
[mergetool "mybc4"]
        #trustExitCode = true
        cmd = '/c/Program Files/Beyond Compare 4/BComp.exe' \"$(cygpath -w $LOCAL)\" \"$(cygpath -w $REMOTE)\" \"$(cygpath -w $BASE)\" \"$(cygpath -w $MERGED)\"
[color]
        ui = auto

[color "status"]
        added = green bold
        changed = yellow bold
        untracked = red
github
installation
- télécharger la dernière version de raspian
- télécharger la dernière version de win32diskimager
- copier l'image sur la carte SD
- pour le wifi creer /wpa_supplicant.conf
//a partir de stretch
country=GB
ctrl_interface=DIR=/var/run/wpa_supplicant GROUP=netdev
update_config=1

//commun
network={
    ssid="The_ESSID"
    psk="Your_wifi_password"
}
- to put a file called “ssh” in the / directory. (cela va activer le SSH )
- insérer la carte SD dans le raspberry pi , connecter les réseaux et puis l'alim
- on récupère l'adresse IP du raspberry pi sur la page des baux DHCP de votre box internet
- connexion en SSH avec puTTY login:pi PSW:raspberry
- passwd pour chamger le mot de passe sinon les hackeurs auront le trop job facile
installation de base
sudo apt-get update //if apt-get very slow under stretch : The problem is the IPV6 network stack. It horks on DNS lookups. sudo nano /etc/sysctl.conf add the following entries to the bottom - net.ipv6.conf.all.disable_ipv6 = 1 net.ipv6.conf.default.disable_ipv6 = 1 net.ipv6.conf.lo.disable_ipv6 = 1 reboot
sudo apt-get upgrade
sudo apt-get clean
sudo raspi-config   //on configure la langue, camera , .. et on "expand" le system de fichier
sudo reboot
sudo apt-get install wiringpi
  $ gpio -v
  $ gpio readall
sudo apt-get install git


// si interface graphique

sudo apt-get install tightvncserver
tightvncserver  // pour ajouter un mot de passe
sudo reboot
vncserver :1 -geometry 1280x710 -depth 24
//on se connecte a l'interface avec client tightVNC viewer @IP:1

// ou Remote Desktop mais consomme plus de RAM 60Mega
sudo apt-get install -y xrdp
//Autostart is configured for you and you don’t need to reboot.
//we can Microsoft’s own Remote Desktop to connect
installation de gedit :
sudo apt-get install gedit
en cas de conflit de librairies lors de l'installation de gedit tenter ceci
sudo apt-get install libwayland0=0.85.0-2
Git gui
sudo apt-get install tig    //591kb mode texte mais seulement viewer
sudo apt-get install git-gui //2,8Mb To run it, press “Alt + F2″ and type “git gui”
sudo apt-get install git-cola  //56.8 MB
sudo apt-get install gitg //1,2Mb ne peux pas faire de push
configuration du wifi a travers le raccourcis du bureau
samba
 apt-get install samba samba-common-bin

 dans /etc/samba/smb.conf configurer ceci
## Browsing/Identification ###

# Change this to the workgroup/NT-domain name your Samba server will part of
   workgroup = GBA
####### Authentication #######
   security = user

sudo service samba restart ou sudo systemctl restart samba

dans /etc/samba/smb.conf ajouter:
[pi Home]
path = %H
comment = %U Home
writable = yes
username = pi
only user = yes
create mode = 0600
directory mask = 0700

smbpasswd -a pi

sudo service samba restart
vim
touche directionnel de vim qui ne fonctionne pas : echo "set nocompatible" >> ~/.vimrc
ajouter la coloration syntaxique a vim : installer vim full : sudo apt-get install vim  //24Mb , ajouter a .vimrc "syn on"
I2C
sudo vi /etc/modules       --> ajouter i2c-bcm2708 et i2c-bcm2708
sudo reboot
sudo modprobe i2c-dev
sudo apt-get install i2c-tools
sudo i2cdetect -y 1   //pour le modele B
sudo i2cdetetc -y 0   //pour le modele A
pi@rasmobot ~ $ sudo i2cdetect -y 1
     0  1  2  3  4  5  6  7  8  9  a  b  c  d  e  f
00:          -- -- -- -- -- -- -- -- -- -- -- -- --
10: -- -- -- -- -- -- -- -- -- -- -- -- -- -- -- --
20: -- -- -- -- -- -- -- -- -- -- -- -- -- -- -- --
30: -- -- -- -- -- -- -- -- -- -- -- -- -- -- -- --
40: -- -- -- -- -- -- -- -- 48 -- -- -- -- -- -- --
50: -- -- 52 -- -- -- -- -- -- -- -- -- -- -- -- --
60: -- -- -- -- -- -- -- -- -- -- -- -- -- -- -- --
70: 70 -- -- -- -- -- -- --

le 48 semble être le  PCF8591
1 wire http://blogmotion.fr/diy/raspberry-ds18b20-14038
temperature @85000
sudo modprobe w1-gpio pullup=1
sudo modprobe w1-therm strong_pullup=1 or 2


testé le 17/05/2019 avec sonde en mode parasite sur minepi (2fils)

pi@MinePi ~ $ sudo modprobe w1-gpio pullup=1
pi@MinePi ~ $ sudo modprobe w1-therm
pi@MinePi ~ $ cd /sys/bus/w1/devices
pi@MinePi /sys/bus/w1/devices $ ls
10-000801090099  w1_bus_master1
pi@MinePi /sys/bus/w1/devices $ cd 10-000801090099
pi@MinePi /sys/bus/w1/devices/10-000801090099 $ cat w1_slave
31 00 4b 46 ff ff 03 10 b6 : crc=b6 YES
31 00 4b 46 ff ff 03 10 b6 t=24562
SW coding
librairie
- (non utilisé a ce jour) http://abyz.me.uk/rpi/pigpio/index.html , semble capable de generer des PWM sur toutes les PIN
- BCM2835
- wiring pi
Outils de la page
